Nathan & Nora’s Infinite Playlist

Processed With Darkroom
I just started watching “Upload”on Amazon. It’s a sci-fi comedy series set in a completely automated future in 2033 centering around Nathan Brown, a handsome and eccentric coder who meets his untimely death in a self-driving car accident. In this universe, in lieu of dying, people can choose to “upload” themselves and their memories online to an afterlife-like cloud game owned by super-corporation, Horizen. You essentially live in this afterlife universe where you can “buy” In-N-Out combo meals, talking therapy dogs, and live in elite lake view accommodations, with the appropriate funds, of course, and “live” amongst other fellow upload-ers and still communicate with the living (and have VR sex with them, too). Every uploader has a Horizen-employee handler “angel” that assists them whenever prompted. Nathan’s “angel” is Nora, a helpless romantic from New York who is falling for Nathan, hard. And it appears, Nathan might be falling for her, too, despite having a still-alive super-controlling girlfriend, Ingrid (who is solely responsible for Nathan’s account and honestly is just terrible). To avoid anymore spoilers, I won’t go into it anymore, but it’s definitely worth a watch.

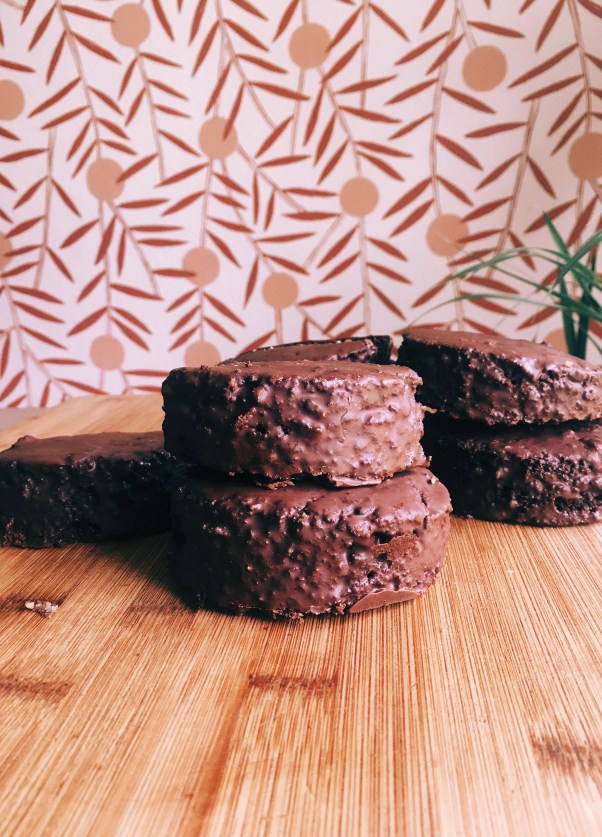
Portland just experienced its first weekend of summer-like weather, and I’m just not ready for it. I’m still enjoying the mild 60s temps where I can wear a peignoir to bed, but still have a light blanket if needed. Just before we hit near 90-degree weather, I cooked up this rich chocolate zucchini cake with creamy two-ingredient chocolate frosting. I stan this cake and Nathan and Nora’s VR relationship.

Processed With Darkroom

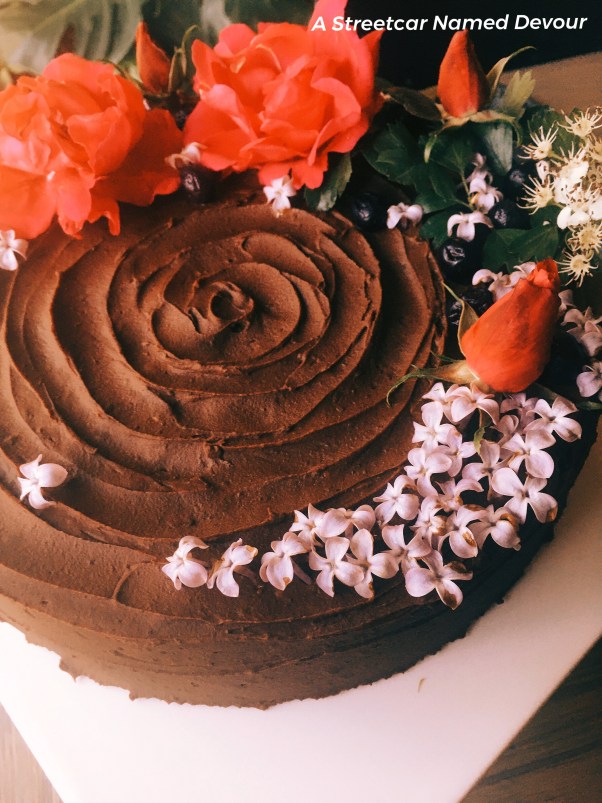
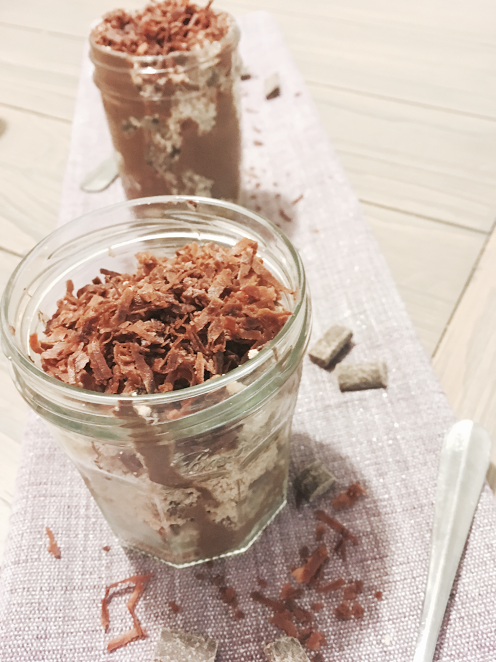
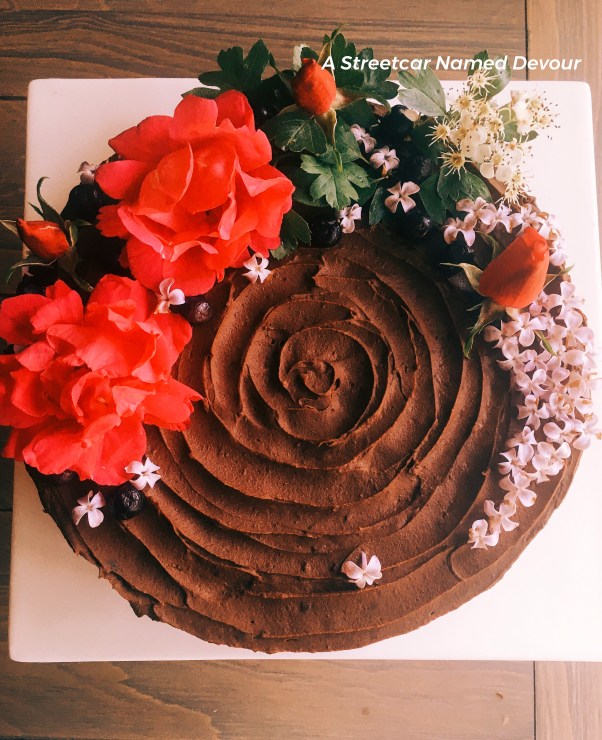
Chocolate Zucchini Cake w/ Chocolate-Coconut Frosting
Yields two 9-inch cakes
Recipe by A Streetcar Named Devour

FOR THE CAKE

INGREDIENTS
1 1/2 cups gluten-free flour blend
1/2 cup gluten-free almond flour
1/2 cup gluten-free oat flour
1/2 cup unsweetened natural cocoa powder
1/2 t baking soda
2 t baking powder
1/4 t salt
3 cups zucchini, grated (about 2 large zucchini)
1 cup coconut oil, melted
1 3/4 cup coconut sugar
4 flaxseed eggs (4T flaxseed + 10T water)
1/2 cup non-dairy yogurt
1 1/2t pure vanilla extract
1 cup non-dairy chocolate chips

METHOD
Preheat oven to 325 degrees. Grease two 9-inch cake pans and dust with flour. Set aside.

Sift and combine all dry ingredients in a bowl and set aside.

Place grated zucchini in a blender and blend till creamy.

In a large bowl, cream the sugar and oil then add in the blended zucchini. Add in the flax eggs, yogurt and vanilla. Cream till fully incorporated.

Gradually stir in the dry ingredients without over-mixing. Fold in the chocolate chips.

Evenly distribute the batter into the two pans. Bake in the preheated oven for 40-45 minutes, depending upon your oven’s settings.

FOR THE FROSTING

INGREDIENTS
1 cup whole-fat canned coconut milk
1 package (10 ounces) vegan chocolate chips I like these
1/2t kosher salt

METHOD
Place the coconut milk and chocolate chips in a sauce pan over medium-high heat. Mix with a rubber spatula till completely melted and incorporated. Add in the salt. Place melted chocolate mixture into a bowl and allow to cool in the refrigerator. The frosting is ready to whip when it’s no longer pourable (from 1.5 to 2 hours).

Once the mixture is ready for whipping, place it in an electric mixer and whip till light and fluffy (about 5 mins). Frosting is ready to use (or lick from the spoon, your choice)!

Present & Company

Processed With Darkroom
I recently went down a Jane Austen rabbit hole, all in thanks to peanut butter frosting. Yes, peanut butter frosting. Stay with me, I’ll explain.

Whilst making peanut butter frosting for some cupcakes for a friend of a friend, my spice grinder overheated and broke. (I make my own powdered sugar which is very easy to make at home, if you have the proper equipment, that is.) I did not have enough powdered sugar to create the consistency I needed for the frosting and made several attempts to “fix” the frosting I had, to no avail. In COVID-19 times, a “quick trip” to the market for new equipment or a box of powdered sugar was out of the question for me.

When I finally threw in the towel, my kitchen resembled that of one Bridget Jones during the famous birthday dinner scene in Bridget Jones’s Diary where her kitchen is turned completely upside-down thanks to blue soup, omelet with caper berry gravy and a dessert that tastes like orange marmalade. I couldn’t help but feel like poor Bridge—so helpless and so quick to reach for the bottle of booze. Her surprising visit from Mark Darcy (ding dong!) to help save the day (and win her heart!) was a dreamy rom-com narrative, but this story doesn’t quite end like that, sadly. Though I’ve spent many a times thinking about it. As well as that scene where Mr. Fitzwilliam Darcy emerges from a pastoral lake after a swim in Pride & Prejudice. (Ding fucking dong!)

I hate throwing away food. Instead, I saved the remnants of the unstructured (yet quite delicious) frosting and put it in the fridge for a later time. Then I continued thinking about Jane Austen, as one does when you’ve been dissecting her work since you were a teenager. I had long wished to watch the TV series adaptation of her final and unfinished work in Sanditon (Available for streaming on PBS with a subscription or via Amazon.) but never had the time to. And oh, well that is no longer an excuse, is it?

I signed up for the week-long free trial subscription with the goal of watching as much content as I can within that time. I binge-watched Sanditon, finishing in a day and a half, and then that turned into watching Northanger Abbey followed by Love & Friendship. In the middle of this Austen-adaptation marathon, I decided to use the leftover frosting and make something to snack on while I binged on the couch. (The bottle of wine needs pairing company, you know.) And then the idea came upon me—the answer is Mr. Darcy. What goes better with peanut butter aside from jelly? Chocolate! And what pairs well with chocolate? Wine! It’s a win-win.

(Side note: This isn’t my first foray in deconstructing Austen’s adaptations work in this blog. Check out this post for more Bridget Jones’s Diary fun.)

I altered the chocolate cupcake recipe I had originally used to make a Ding Dong. The peanut butter frosting doesn’t have the same marshmallow-like consistency of the original Hostess treat, but what this cake snack lacks in that filling texture well makes up for in flavor. Trust me when I tell you these “Ding Dong”-like treats are the belle to any Regency ball.

As with all of my more recent recipes, this is vegan and gluten-free. You most certainly can make this with gluten by subbing the GF flour with pastry flour.

==

Processed With Darkroom

Peanut Butter Ding Dong Cakes
Yields about 6 cakes (with leftover scrap pieces for even more snacking!)
Complete Recipe by A Streetcar Named Devour
Cake recipe slightly adapted from Minimalist Baker

FOR THE CAKES

INGREDIENTS
2 flaxseed eggs (2T flaxseed + 5T hot water combined)
1/2 cup non-dairy milk (I used soy in this with wonderful results)
3/4t apple cider vinegar
1.5t baking soda
1/3 cup coconut sugar
1/3 cup blackstrap molasses
1/4 cup coconut oil, melted
1 cup applesauce
1/2t pure vanilla extract
1/4t Kosher salt
1/3 cup cocoa powder, sifted
1/2 cup GF oat flour
1 cup GF blend flour

METHOD
Preheat oven to 350 degrees. Grease a 9-inch non-stick square pan like this and a 9″x5″ loaf pan like this one with oil and dust with some GF flour. (If you have a pan large enough that fits 6 cakes, go for it!)

Combine the flaxseed egg ingredients  in a small bowl and set aside. Combine the milk and vinegar in a separate large bowl and allow to sit for a few minutes while you gather the rest of your ingredients. (This will give your milk time to curdle.) Then add the baking soda to the milk-vinegar mixture.

Add the flax eggs, sugar and molasses to the milk-vinegar mixture. Mix to combine. Add the applesauce, coconut oil, vanilla and salt to the mix, stir. Sift in the cocoa powder. And then mix in the flours. You should get a nice thick batter.

Distribute the batter to both pans evenly. Bake for about 30-35 mins or until the cake is done. Once done baking, set aside to cool.

FOR THE FROSTING

INGREDIENTS
1/3 cup creamy peanut butter
1/4 cup vegan butter (I like Miyoko’s or Earth Balance)
1/2t pure vanilla extract
3/4 cup powdered sugar
1/8 cup soy milk

METHOD
In a hand-held or stand mixer, cream the peanut butter and vegan butter together till light and fluffy. Slowly add in the vanilla extract and mix till combined. In 1/4 cup increments, add in the powdered sugar, alternating with a bit of the soy milk every time. Set aside.

FOR THE CHOCOLATE COATING

INGREDIENTS
1 cup vegan dark chocolate
1T coconut oil

METHOD
In a double-boiler (a heatproof glass bowl over a pot of boiling water) melt the chocolate. Turn off the heat and then add in the coconut oil.  Stir to combine.

ASSEMBLY
Once the cakes are cooled down, use a circular cookie cutter to punch out six cakes. I have (and love!) this one. Carefully remove the scraps and set aside for a later project or in-between snacking.

With a piping bag and 1M star tip,  flip the cake over and pipe a bit of the frosting. Repeat with the rest of the cakes.

Set up a cooling rack with a baking sheet underneath and take your melted chocolate bowl and place a cake (one at a time) in the melty chocolate. Flip it over to fully coat each side. Carefully remove the cake and set on the cooling rack top side up. Repeat till all cakes are nicely coated. Take the cooling rack/sheet tray to the refrigerator to set the chocolate, about 30 mins to an hour.

The cakes are ready to eat once the chocolate has completely dried and no longer leaves a thumbprint when you touch the chocolate.

Enjoy with a bottle of wine and your favorite Jane Austen book or film!

Processed With Darkroom


A Love That Spans Centuries

Photo by A Streetcar Named Devour

Original photo by Aimee Spicks/STARZ

I stan a ride-or-die couple. And I’m currently obsessing over Starz-streamed series, “Outlander.” If you haven’t watched yet, the story revolves around our two main characters, Claire (a time-traveling WWII nurse from England), and an 18th Century Scottish Highland warrior named Jamie Fraser. I won’t delve too much into the storyline, but these star-crossed lovers will do whatever it takes to protect each other. It’s a love that spans centuries.

The Linzer Torte (the original form of this tasty treat) is actually much older than our fictitious Scottish Jacobite, and dates as far back as the 17th Century in Linz, Austria. (The oldest known recipe is from 1653!) The name originated as “Helle Linzer Plaetzchen”  which in German literally translates to “bright Linzer cookies.” The much easier to make version is the sandwich cookie, with its characteristic cut-out shape exposing the fruit jam and is lightly dusted with confectioner’s sugar. This version is gluten-free and vegan.

==
Gluten-Free + Vegan Linzer Cookies

Recipe slightly adapted from About to Sprout
Recipe yields about 8 cookie sandwiches 

Photo by A Streetcar Named Devour

INGREDIENTS

2.5 C almond flour (I like Bob’s Red Mill)

4T coconut oil, melted

1/4 C date syrup

1/2t fresh lemon juice

1ea lemon, zested

1t pure vanilla extract

1/2t Kosher salt

1/4t Baking soda

1C Jam, fruit preserve of choice (my fave store-bought are from Crofter’s)

1/4C powdered sugar for dusting

METHOD

Combine all ingredients into a bowl. If the dough is too sticky, sprinkle in a bit of almond flour till it’s pliable but not too dry.

Mound dough onto a flat surface and shape into a disc. Wrap in plastic and place in the refrigerator for 20 mins.

Preheat oven to 325 degrees.

Line 2 sheet trays with parchment paper.

Once dough is chilled, unwrap and place between two pieces of parchment paper.

Roll out dough to 1/4-inch thick. Cut out 16 cookies (using a large heart-shaped cookie cutter) and place 8 of those cookies on the parchment-lined sheet tray. (You may need to re-roll your dough to get more cookies.)

Use a small heart-shaped cookie cutter inside the larger hearts. If you don’t have a smaller cookie cutter you can free-hand it like I did.

Place onto sheet tray, making sure cookies don’t touch (they’ll spread a little).

Bake for 8-12 mins depending on your oven. Mine were done at 8 mins, so keep an eye on them and pull out once they’re a nice golden brown.

Allow to cool on a cooling rack.

TO ASSEMBLE
Line cookies with the base of the cookie bottom sides up and spoon about 1T of fruit preserve. Top with double-heart cookie half to expose the jam.

Top with a light dusting of sugar.

Continue reading

The Kids Are Alright

ADDC9484-E368-44FB-AAF0-639B1E078A8F.jpeg

Holiday get-togethers can be a bit challenging for us folk who have food allergies. It is sadly true. We are the ones who come to birthday + holiday parties, weddings, showers, potlucks, sulking at the buffet table full of food that we simply cannot eat. We stand there and salivate over all the pies, pizzas, bread, cakes, cookies, cheesecakes, cheese plates, etc., that are hands off. I mean, we *can* eat them, sure, but that would mean we want to:

A) Die

B) Get rushed to the hospital 

C) Be stuck on the toilet for the next week, wishing we were dead 

D) Be stuck lying on the floor next to the toilet in the fetal position, wishing we were able to physically get onto the toilet 

It’s not fun. For us or for our loved ones who have to deal with it. I once accidentally ate a few bites of risotto at a “build your own risotto bar” at a wedding thinking that all the cheeses that were placed in separate bowls at the build-your-own bar were my signal that the actual risotto base didn’t include cheese. I was wrong. I was so deeply wrong. My body made sure to tell me how wrong I was. I was sick for a few days after that, and have avoided “build-your-own” risotto buffets ever since.

For holiday parties, and actually, any party all year round, I love making this Chocolate Chip Banana Bread recipe and bringing it to parties because it’s so dang delicious, moist AF, and is gluten-free, vegan AND nut-free. It’s perfect for adults and kids with food allergies.

I hope you try out this recipe, and if you do let me know how it turns  out.

xo Kelly Rae

==

F9E8130F-C54D-412B-BAE6-10248D34B636.jpeg

Chocolate Chip Banana Bread Gluten-Free, Vegan, Nut-Free

Recipe slightly adapted from Kitchen Confidante

INGREDIENTS

1 C brown rice flour

1/2 C potato starch

1/4 teaspoon salt

3/4 teaspoon baking powder

3/4 teaspoon baking soda

1/2 cup coconut sugar

1/2 cup maple syrup or agave syrup

1/4 cup vegan butter or coconut oil, at room temperature

1 flaxseed egg (1 Tablespoon flaxseed meal + 2 1/2 Tablespoons water, mixed together in a small bowl)

1/2 cup “vegan buttermilk” (coconut milk plus 1 teaspoon apple cider vinegar, mixed together)

3 very ripe bananas, mashed with a fork 

1/2 dairy-free chocolate chips (I’m a die-hard Enjoy Life bittersweet chocolate fan!)

METHOD 

Preheat oven to 300°F. 

Grease your loaf pan with coconut oil, olive oil or vegan butter and line the base of your pan with parchment paper.

Whisk together the flour, salt, baking powder and baking soda. Set aside.

In a mixing bowl with a paddle attachment, cream together the sugar and butter. Stir in the flax egg and then the bananas, and lastly adding the vegan buttermilk. Slowly add the dry ingredients and then the chocolate chips and mix till just incorporated to avoid over mixing.

Pour batter into greased loaf pan for about 45 minutes to 1 hour, depending on your oven. If in doubt, do the toothpick test.

Why do you build me up? Buttercup?


Desserts in teensy weensy jars and ramekins are so darn cute. This veganized recipe doesn’t require any baking–it’s foolproof and just needs about 2 hours in the fridge to set. That’s right. No butter. No cream, eggs. Nada. You might ask, how does this taste so good without all the dairy? And I’ll say, you won’t even miss it.

Xx Kelly Rae

==


Chocolate Vegan Pots de Creme with Gluten-Free Graham Cracker Crumble
Serves 8
By Kelly Rae — A Streetcar Named Devour

FOR THE GRAHAM CRACKER CRUMBLE

INGREDIENTS
1 cup cashews (or whatever nut variety you have in your pantry)
1/2 cup pitted dates
1 Tablespoon coconut flour
1/2 Tablespoon coconut oil, melted
1.5 teaspoons ground cinnamon
1/2 teaspoon vanilla extract
1/4 teaspoon kosher salt

METHOD
Pulse together in a food processor till crumbly.

FOR THE POT DE CREME

INGREDIENTS
2 cups silken tofu (do not use firm tofu)
8 ounces dairy-free dark chocolate, melted (I use Enjoy Life)
3 Tablespoons coconut oil, melted
1 Tablespoon espresso powder (King Arthur Flour makes the best! I got mine via Sur La Table)
1/4 cup cashew milk (or any plant-based milk of your choosing)
1-3 Tablespoons maple syrup (optional, if you like a sweeter pot de creme)
1/4 teaspoon kosher salt (optional)
1/2 cup unsweetened shredded coconut, toasted and for sprinkling

METHOD
Melt the chocolate over a double boiler, making sure not to burn it.

Place all ingredients into a blender and zap till thoroughly blended.

Divvy up into different-sized ramekins or Mason jars, depending on how many portions you need. Layer the graham cracker crumble in between layers of the chocolate puree.

Place in the refrigerator for at least 2 hours to fully set.

Serve with toasted shredded coconut. Boom.

Mint Condition

IMG_0787

Quick question! What’s your favorite ice cream flavor?

Mine?

Mint + Chip.

Why?

‘Cause it’s double the coolness factor. Frozen in temperature and cooling in flavor. It’s next-level sensory overload. All of your senses are tested:

You SEE the bright green color
You SMELL that crisp scent of mint
You FEEL that cold, refreshing cream melt in your mouth as you bite into those chocolate chunks
You TASTE that creamy delicious mint packed with that bittersweet chocolate

And well, HEAR? If you’ve ever sat next to me while enjoying said ice cream (or pretty much any food I thoroughly enjoy), you’re sure to hear lots of “MMM” sounds. Sorry not sorry.

This year we started a garden on our balcony. It’s taken off and has done considerably well. Even with the sudden drop and rise of temperatures all summer long, most of our plants have been pretty happy. Our mint plant, which we originally planted next to thyme and lavender, took off immediately and spread throughout the entire planter within a week! That was an amateur mistake on my own part ’cause I knew that mint likes to take over EVERYTHING. And she did. So we uprooted her and placed her in her own good-sized planter where she was able to stretch and relax without bothering her next-door neighbors.

Having an abundance of mint isn’t a bad thing, either. I decided to harvest a few bunches and steep them into heavy cream as a base for this amazing ice cream recipe I found through David Lebovitz’ book, The Perfect Scoop.

The recipe was originally written for a Chocolate Malt Ice Cream flavor, so I made some adjustments to the recipe, and omitted the cocoa powder, replacing it with a snack-sized box of crushed Whoppers candy and chocolate sandwich cookies like OREO’S. I also added more heavy cream (using one of my local favorites from Sunshine Dairy). The resulting flavor is intensely rich, creamy and so silky smooth. Try it.

IMG_0786

==

Malted Mint Whopper Cookie Ice Cream
Yields 1 quart
Recipe via The Perfect Scoop

INGREDIENTS
3 cups heavy cream, divided
2 cups fresh mint leaves, packed
1 cup whole milk
¾ cup sugar
1 teaspoon Kosher salt
5 large egg yolks
1 teaspoon vanilla
1 cup malted milk powder

METHOD
Heat 1.5 cups heavy cream with the mint in a medium-sized saucepan. Once brought to a boil, whisk vigorously and lower heat to a low simmer, continuing to whisk. Remove pan from the heat and strain into a large bowl the rest of the heavy cream into a large bowl, combining the steeped minty cream together.

Gently warm the milk, sugar and salt in the same saucepan. In a medium-sized bowl, whisk the yolks and temper the eggs by slowly adding the warmed milk to the  yolks, continuously whisking and scraping the now tempered egg yolk/milk mixture back in the pan.

Using a rubber spatula continue to stir and scrape the combined mixture over medium heat, making sure not to “cook” or “curdle” the eggs. Once the mixture is thickened and coats the back of a spatula, immediately remove from the heat and pour through a strainer and into a shallow pan or bowl. Add the vanilla extract and malt powder. Cool the mixture by placing it into the refrigerator till chilled, overnight is preferred.

Once ready to churn, operate your ice cream maker and add the crushed Whopper candy and cookies toward the last five minutes of the churning process. Place the ice cream in the freezer to further freeze. Enjoy! (Or have a quick milkshake. Your call.)

IMG_0782

IMG_0781

A Miracle Worker

aguaditolede
I don’t get sick too often. Maybe once or twice a year, tops. So when I do get sick all hell breaks loose. I simply hate getting sick and avoid it like, say, the plague.

Blame it on over-exhaustion, not getting enough sleep, working too much. Whatever week-long illness it was, it was completely unbearable. I had this unstoppable cough that seemed to worsen at night while in bed trying to sleep. The incessant coughing led to a sore throat and muscle pains in the abdomen; it was like I was doing nonstop crunches, but no 6-pack to show for.

What I needed was a miracle. Or Miracle Max.

mm1

My regimen to nurse these ailments included daily vitamins, Emergen-C, so much orange juice, a hot elixir comprised of honey, fresh lemon juice, ginger, cinnamon, cayenne and turmeric. (It does the trick and nicely coats the throat.) But what really helps is a chicken soup of some kind. I had purchased a whole chicken and decided to make this Peruvian Aguadito soup quite reminiscent of the ones I used to enjoy at the L.A. Peruvian mini-chain, El Pollo Inka, that I used to frequent. The soup only gets better with a squeeze of the restaurant’s cilantro-chile sauce.

This Aguadito is a miracle worker, a magician, or brujo–the Miracle Max of soups. It has magical powers, I think, bringing you back to life. So much so that I felt increasingly better every time I consumed it (I ate the whole thing over the course of a week).

mm2

mm3

unnamed-2

I butchered the whole chicken into 10 pieces (halving the breasts) and kept the leftover bones to make stock for another time. The base of the recipe is usually mild, but I needed an extra kick of heat to help clear my nasal passages, and replaced with whole jalapeños for the typical serrano.

Make this the next time you start to have the ill feels. And once you start feeling better, have fun storming the castle.

mm4

Peruvian Aguadito Chicken + Rice Soup
Recipe slightly adapted from A Cozy Kitchen
Serves 4-10

INGREDIENTS
2 bunches cilantro, stems discarded
12 garlic cloves, peeled
2 medium-sized jalapeños, stems discarded
10 cups chicken stock
3 Tablespoons extra-virgin olive oil
1 whole chicken, skin-on and bone-in, butchered into 10 pieces (2 drumsticks, 2 wings, 2 thighs, 2 breasts halved into 4 pieces)
1 medium-sized red onion, julienned
2 teaspoons ground cumin
1 teaspoon cayenne
1/3 cup long grain rice
1 can corn, drained
1/2 cup fresh lime juice
salt and pepper, to taste

METHOD
Purée the cilantro, garlic, jalapeños, and 1/2 cup of the chicken stock in a food processor or blender.

Heat 2 tablespoons of the olive oil in a large stock pot over medium-high heat. Add the chicken pieces, skin side down and season with salt and pepper, cooking for 5-10 minutes or till lightly browned. Turn and sear the other side for an additional 5 minutes. Once all sides are nicely seared, remove from the pot and set aside.

Add the remaining tablespoon of olive oil and add the onions and sauté till translucent. About 5-7 minutes. Add in the cilantro-garlic and jalapeño purée. Stir for 3 minutes to incorporate. Add in the rice, cumin and cayenne, stir for 2 minutes.

Slowly pour in the stock, stirring to incorporate. Bring to a boil, then add in the chicken pieces. Turn down the heat to low, add the corn and allow to simmer for 30-40 minutes.

Finish with the lime juice and season with salt and pepper to taste.

unnamed-1

unnamed-5

(Editor’s Note: All movie screenshots in this story are property of Act III Communications and Twentieth Century Fox.)

No Contest

thaichowlede

Thai food has become my comfort food. It’s the cuisine I crave on the regular. It’s become a big problem.

At work we had an open call “Salmon Chowder Contest” that would run on our menu at the restaurant if it was chosen to be the winner. This is the soup I made for the contest.

I decided to base my recipe off of one I made last year for my Tom Kha Gai soup. It’s not your traditional chowder, but it’s crazy delicious. Like, it’s really good. Trust me.

Forget tradition and try this! You won’t be disappointed.

Coconut Salmon Chowder
Yields 2 quarts

FOR THE CHOWDER

INGREDIENTS
2 nubs medium-sized galangal, peeled and sliced*
1 stalk lemongrass, white part only, sliced thin
5 kaffir lime leaves
6 Thai bird chiles
1 Tablespoon coconut oil
1 yellow onion, julienned
2 cups Yukon potatoes, peeled and medium-diced
3 cloves garlic, minced
2 cans coconut cream
2 cups vegetable stock
1 pound salmon, skin-off, cut into medium-sized cubes
1/8 cup fish sauce
2 Tablespoons granulated sugar
1 cup Thai basil, picked and minced
1 cup cilantro, picked and minced
1 lime, zested and juiced
salt and pepper, to taste
*galangal is a rhizome from the same family as ginger, used primarily in Thai, Lao and Vietnamese cooking. Find it at your local Asian supermarket.

METHOD
Place the first 4 ingredients in a food processor and process to a paste. Heat the oil in a saucepan over medium heat and add the paste, stirring till fragrant; about 5 minutes. Add the onions and saute till lightly browned. Add the potatoes and garlic and stir for a minute.

Turn down the heat and add the coconut cream and stir. Stir in the fish sauce and sugar, and bring to a gentle simmer, then add the salmon and simmer for an additional 5 minutes or till salmon is cooked.

Add the cilantro, Thai basil, lime zest and juice. Season with salt and pepper. Top with a healthy drizzle of Thai basil oil. (Recipe below).

thaichow1

FOR THE THAI BASIL OIL
Yields 2 cups

INGREDIENTS
2 cups Thai basil, packed
2 cloves garlic, peeled
1 3/4 cups olive oil
1/4 teaspoon salt

METHOD
Blanch the basil leaves in boiling salted water for 20 seconds. Remove the basil and shock in an ice water bath. Add in the garlic and olive oil. Process in a food processor till fully combined.

Store in an airtight container overnight in the refrigerator. Not he next day, strain the oil through a fine-mesh sieve, discarding the leaves.

thaichow2

thaichow3

Eat Like a Viking

streetcaraebleskivlede
Much of the history surrounding the origin of the Danish aebleskive is shrouded in mystery—and to some, in ancient Scandinavian folklore. Legend has it that during the days of the Vikings, after the warriors returned home, hit hard in battle (many poorly wounded and hungry) mixed together flour with milk, and cooked the batter inside the hollows of their iron shields and horned helmets (which, too, were dented and broken) over an open fire.

The result: A delicious golf ball-shaped cake, golden on the outside and fluffy in the middle.

Today, aebleskiver (plural) which roughly translates to “sliced apples” are enjoyed by just about anyone in every corner of the world. Topped simply with powdered sugar, filled with delicious lingonberry jam, or dipped in a creamy lemon curd—the possibilities with these apple-shaped delights are endless. For my first solo (and best!) attempt at aebleskiver-making (I can briefly remember a short lesson on making them in culinary school), I decided to pair a simple aebleskive recipe with an of-the-moment curd. While we’re still in a weird transitional season from late-fall to winter fruits, I made a delicious pomegranate-lemon curd that pairs perfectly with this recipe.

Cooking with a special aebleskiver pan makes this recipe so much easier, but I used a mini muffin pan, and it worked out PERFECTLY.

unnamed-14
Aebleskiver (Danish Pancakes)

Yields 16
Recipe slightly adapted from Serious Eats

INGREDIENTS
1 cup all-purpose flour
1/2 teaspoon baking powder
1/2 teaspoon salt
2 Tablespoons sugar
2 eggs, separated
1 cup half and half
4 Tablespoons unsalted butter, melted

SPECIAL EQUIPMENT
Aebleskiver pan (found in select cooking supply stores, like Sur La Table)
or, use a mini muffin pan (which I did.)

METHOD
Whisk together the AP flour, baking powder and salt, then set aside. In a larger bowl, whisk together the egg yolks, milk and 3 tablespoons of the melted butter until just-combined. Slowly stir in the dry ingredients with a rubber spatula, don’t overmix, as it should be slightly lumpy.

aebleskivbatterstreetcar

In the bowl of an electric mixer with a whisk attachment, beat the egg whites till stiff peaks form,  about 5 minutes. Then fold in the whipped egg whites into the lumpy batter.

aebleskivstreetcar

If you have an aebleskiver pan, place the pan over medium-high heat. Add the remaining 1 tablespoon of butter evenly to each well of the mold, and once the butter starts to bubble, add 2 heaping tablespoons of batter. Allow the aebleskiver to cook till the bottoms are golden, about 4 minutes, then flip and continue cooking till the tops are golden brown, about 3 minutes. Transfer cooked pancakes to a plate covered with foil to retain heat. Repeat steps till the rest of the pancake batter is used.

aebleskivpanstreetcar

If you DON’T have an aebleskiver pan, preheat your oven to 350 degrees and place a mini muffin pan into the oven to heat up. Once your oven is up to temperature, remove the muffin pan and add the remaining 1 tablespoon of butter into each mold well, then add about 2 heaping Tablespoons of pancake batter into each well. Place into the oven and allow the aebleskiver to cook till the bottoms are golden, about 3 minutes. Once you see that the bottoms are golden, remove from the oven and flip each pancake onto the other side.

aebleskivstreetcarcooked

Raise your oven’s temperature to 425 degrees, and once heated up, place the aebleskivers back into the oven to finish cooking for another 3-5 minutes, till golden brown. Once done, immediately transfer the cooked aebleskiver to a plate covered with foil to retain heat, and repeat the steps till the rest of the batter is used.

Garnish with Pomegranate-lemon curd. (Recipe here)

aebleskivballsstreetcar

aebleskivpatternstreetcar

aebleskivstreetcarstyled

Bao Down

baodownlede
Gua Bao
is a Taiwanese street food, comprised of a steamed bun, braised meat, and other fillings. I was first introduced to these teeny-tiny bites of delight while I worked for a food truck in San Francisco. Every weekend our truck met with other food trucks at Fort Mason hosted by Off the Grid, a Bay Area-based food and music event planner of sorts, bringing together only the best local food trucks at different venues weekly throughout the Bay. Off the Grid events were super fun to work because we were always busy and we got to meet some really awesome and talented people in the food truck community. One of my favorite trucks that I became a huge fan of was Chairman Bao, food truck that specialized in gua bao. A light and fluffy steamed bun with a tender, crisp slice of pork belly, with a nicely pickled crunch of daikon. So many excellent flavors all in one bite. You can’t help but want more.

This week I put my own spin on gua bao with braised pork belly, sweet pickled papaya and spicy pickled cucumbers.

unnamed-2

FOR THE BUNS
Recipe slightly adapted from Food52
Yields 16

INGREDIENTS
1 Tablespoon active dry yeast
1 cup water, room temperature
2 1/8 cups flour
3 Tablespoons granulated sugar
1 1/2 Tablespoon nonfat dry milk powder
1/2 Tablespoon Kosher salt
1/4 teaspoon baking powder
1/4 teaspoon baking soda
1/4 cup reserved pork fat, room temperature (you can use bacon or pork belly fat)

METHOD
Set up a stand mixer with a dough hook. Place the yeast and water together and mix just to incorporate to activate the yeast. Let it sit for 10 minutes. Then add in the flour, sugar, milk powder, Kosher salt, baking powder, baking soda and fat and mix on low for about 10 minutes. After the mixing cycle, your dough should be gathered into a ball. Place the dough ball in a lightly oiled medium-sized bowl, wrapped in plastic wrap. Keep the bowl in a warm area of your kitchen and allow the dough to rest for about 1 hour to 1 hour and 30 minutes, or until the dough has doubled in size.

unnamed-7

Once the dough has rested and risen, transfer it onto a lightly floured work surface. Use a sharp knife to divide the ball in 2 equal-sized pieces.

unnamed-10

Then divide each half into 4 equal-sized pieces, making 8.

unnamed-11

Roll each piece into mini logs, then cut each log in half, making 16 pieces total.

unnamed-12

Each piece should weigh about 25 grams each and be about the size of a Ping-Pong ball. Then roll each piece into a ball and place on a baking sheet. Loosely wrap the sheet tray with plastic wrap and allow to rise for a half-hour.

unnamed-13

After the buns have rested, use a rolling pin to roll each ball into a 4-inch-long oval. Brush each bun lightly with oil, and lay a chopstick horizontally across the center of the oval and fold it over onto itself to form a bun. Gently pull out the chopstick, leaving the bun folded, and place it onto a sheet tray, allow all the rolled out buns to rest for another 45 minutes.

unnamed-16

Set up a steamer on top of your stove. Steam your buns in batches so the steamer isn’t overcrowded, and steam them for about 8 to 10 minutes. Quickly remove each bun and place on a sheet tray to cool.

unnamed-14

The steamed buns can be used immediately or kept frozen in Zip-Lock bags for up to 2 months. Reheat the frozen buns on a stove top steamer for about 3 minutes, or until soft and warmed all the way through.

FOR THE FILLING
Recipe slightly adapted from Serious Eats
Serves 4-8

INGREDIENTS
1/2 pound slab skin-on pork belly
1 Tablespoon olive oil
1 clove garlic, minced
1 stub ginger, peeled and minced
3 each star anise
2 each Thai chili
2 Tablespoons brown sugar
1/4 cup Asian rice wine
1/2 teaspoon Chinese 5 Spice
1/2 cup dark soy sauce
1/4 cup light soy sauce
3 cups water

METHOD
Heat a nonstick or cast-iron skillet on medium-high. Once hot, place the pork belly into the pan and allow to sear for 5 minutes (or until light golden brown) before turning the belly onto the other side. Allow to sear for another 5 minutes, flipping the belly till all sides are seared nicely.

unnamed-15

Remove the belly and place onto a plate. Lower the heat to medium, then add the oil, garlic, ginger, and chilis. Toss for 2 minutes. Then add the star anise and brown sugar. Stir for a minute then deglaze with the wine. Stir till the sugar is melted.

Add the rest of the ingredients and stir thoroughly. Return the belly to the pan and turn down the heat to low. Carefully cover the pan with a lid or aluminum foil. Allow to braise for at least 1 hour. Check the belly for tenderness after 1 hour. Cook till fork tender.

unnamed-17


FOR THE PICKLES

unnamed-9

Spicy Pickled Cucumbers
Yields 1 cup

INGREDIENTS
1 large English cucumber, thinly sliced
1 1/2 cups rice wine vinegar
1/3 cup sugar
1 Thai chili, julienned
1 Tablespoon Kosher salt
2 teaspoons red pepper flakes
2 teaspoons black sesame seeds

METHOD
Heat the vinegar, sugar, chili, salt, pepper flake and sesame seeds in a small pan till boiling. Place the sliced cucumbers in a Mason jar or deli cup, then pour the boiling brine into the jar then cover. Allow to sit in room temperature for an hour, then keep in the refrigerator.

Sweet Pickled Papaya
Yields 2 cups

INGREDIENTS
1 small green papaya, cored and thinly sliced
1/2 cup rice wine vinegar
1/2 cup granulated sugar
1/2 cup water
1 teaspoon Kosher salt

METHOD
Bring the vinegar, sugar, water and salt to a boil until the sugar is dissolved. Pour the brine into a Mason jar or deli cup with the papaya. Cover tightly and allow to sit in room temperature for 1 hour. Then keep in the refrigerator.

Pickles can be used once cooled, and stored in the refrigerator for up to 3 weeks.

unnamed-1

TO ASSEMBLE
16 steamed buns
braised pork belly, sliced into 16 pieces
hoisin sauce
spicy pickled cucumbers
sweet pickled papaya
1/4 cup cilantro leaves

METHOD
Place a slice of the pork belly into the bun, smear a little hoisin sauce on the pork. Put 3-6 cucumber slices and about 3 tablespoons of papaya on top of the pork. Sprinkle with cilantro leaves. Enjoy!

unnamed-3

baodownstyledlast

baodownend